
The Photos app on your Mac is a powerful, versatile hub beyond mere image storage. Whether you’re a seasoned Mac user or a newcomer to the Apple ecosystem, the app is helpful. You’ll experience stunning visual stories and enjoy Apple’s robust features. Today, we’ll explore five tips and tricks to master the photo app, helping you enhance your digital photography experience.
5 Tips and Tricks to Master the Photos App on Your Mac
In the realm of designvelopment, where design seamlessly intertwines with development, mastering the intricacies of the Photos App on Mac becomes a journey of both artistry and functionality. As a seasoned Designveloper, let me distill our collective expertise in this article into actionable insights for you.
#Tip 1. Delete duplicate photos
Can someone delete duplicate photos on Mac? This could be your question after realizing that the duplicate photos occupy too much space on your Mac, potentially slowing it down. Hence, a need to delete them.
To remove duplicate photos, you can use tools that automate the process or delete them manually. The three ways you can use to remove duplicate photos from your Mac include the following:
1. Remove duplicate photos in the photo app
The Photos app easily identifies and removes duplicate images by merging them. This feature is integrated into macOS Ventura but does not apply to earlier operating systems such as Big Sur, Catalina, or Monterey.

Here’s how to remove duplicates in the photo app:
- Open the Photos app in the Launchpad and select Duplicates in the sidebar.
- Choose photos to merge (one row or more).
- Click Merge. Mac keeps the original and deletes copies.
2. Use finder to remove duplicates manually
While your duplicate photos can be anywhere on your Mac, macOS Finder’s Smart Folders helps Streamline Mac duplicate photo cleanup. No need to scour every folder—easily identify and delete duplicates.
Here are the simple steps to follow:
- Open Finder, then click on File and choose New Smart Folder.
- Select This Mac and click on the + sign in the upper-right corner.
- Choose Kind in the first menu and Image in the second. If you want, organize the files by Name.
- To get rid of some photos, right-click on them, choose Move to Trash, and then empty Trash.
FURTHER READING: |
1. Top 11 Free Stock Photo Websites |
2. 7 Best Free Website Icons You Should Bookmark |
3. Designing A Business Logo: Everything You Need to Know |
#Tip 2. Edit your pictures with precision

The Photos app on your Mac offers a range of powerful editing tools. You can adjust exposure, color balance, and sharpness. Retouching and fine-tuning help in enhancing professional results.
Familiarize yourself with the app’s editing interface, including cropping, rotating, and applying filters, to unleash your creativity and elevate your photos.
Here are steps to edit photos on your Mac:
- Choose the photo you want to edit and Double-click it.
- Select Auto Enhance if you want the photo to improve automatically.
- To edit manually, click Edit on the top-right corner and adjust everything you want on the photo.
- After editing, click Done on the top-right side.
1. How to compare photos after editing
After editing, compare the original and the edited photo using these simple steps:
- Double-click the photo on the photo app.
- Select Edit on the toolbar.
- Click and hold Without Adjustments or long-press the M-key to see the original photo.
- Release the M key or the button to see the edits.
2. How to copy and paste edits on your Mac
After editing your image, you can copy and paste the adjustments by following these steps:
- Open the photo app and double-click the photo you’ve edited.
- Click Edit on the toolbar.
- Select Image > Copy Edits.
- Click one or more photos you want to edit.
- Select Image > Paste Edits.
#Tip 3. Efficiently export pictures
Tailor the resolution, file format, and compression settings to suit your needs. Exporting in various formats ensures compatibility with different platforms and applications. Besides storing the photos in the photo app, you can transfer them directly to Mac and use Finder to access them.
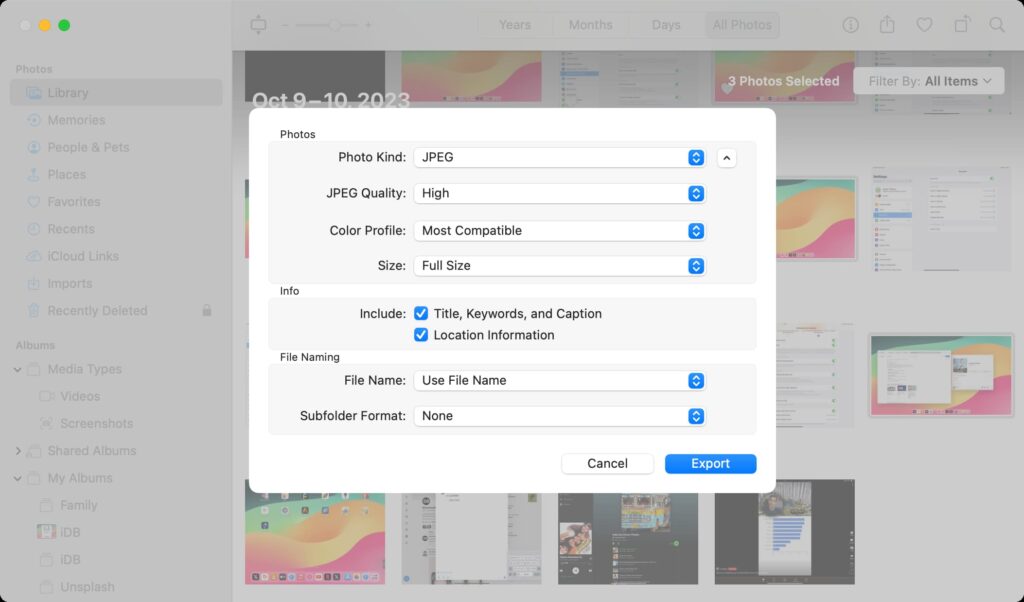
To export faster, choose the export photo, then drag it to the desired folder. Otherwise, use the following steps:
- Choose the photo to be exported.
- Go to the menu bar and select File.
- Choose Export and select either Export Unmodified Original For 1 Photo or Export 1 Photo.
- Click Photo Kind and select your preferred file type:
- PNG is a lossless format suitable for web images.
- JPEG makes small files suitable for other photo apps and websites.
- The TIFF file format works better when transferring photos between apps and websites.
- Click File Name and choose your preferred name (this step is optional).
- Click Subfolder Format and select how to divide the exports into folders.
- Click Export.
- Select where to save, then click Export.
#Tip 4. Organize photos efficiently with smart albums
Harness the power of Smart Albums in the Photos app to automatically categorize and organize your images based on specific criteria. Create dynamic albums that update in real-time, saving you the hassle of manual sorting.
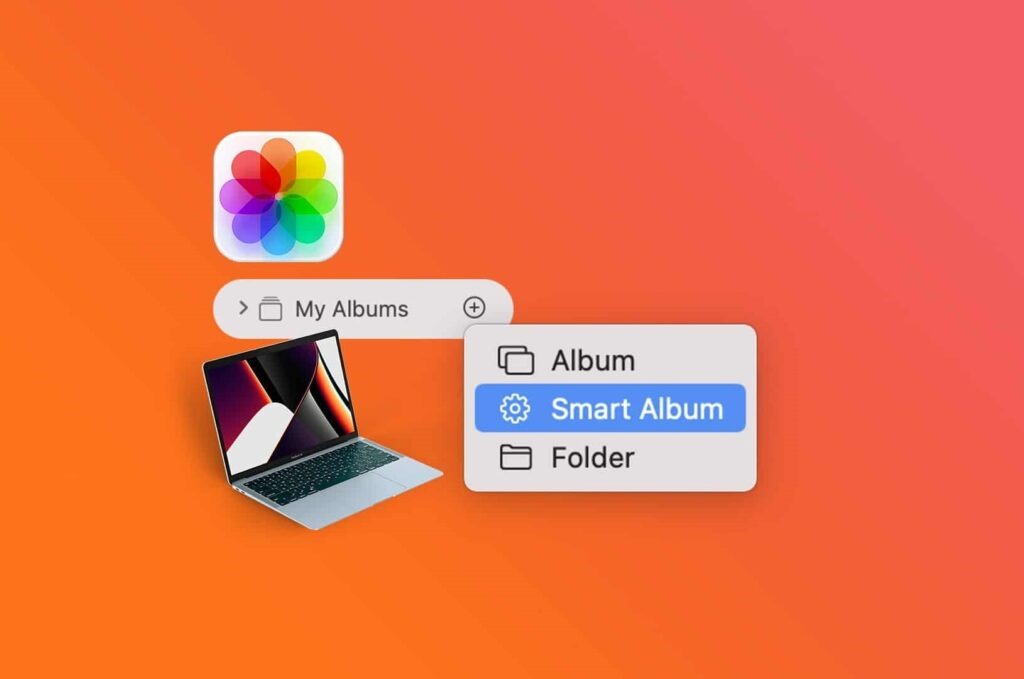
Use attributes like date, keywords, or facial recognition to streamline your photo library and easily locate pictures. This feature aligns with the predecessor programs, although the ability to rate photos has been removed.
Here are the easy steps to follow:
- Open the Photos app.
- Go to the file menu and click the New Smart Album.
- Type the year for the photo album name.
- Click the photo to open the menu.
- Select the date captured.
- Click IS.
- Change date range.
- Click OK.
#Tip 5. Fortify privacy with password-protected albums
Keep your sensitive photos secure by password-protecting hidden or recently deleted albums. This extra layer of security ensures that only authorized users can access and view these albums, safeguarding your private moments.

To add a password to your photos, follow the following steps:
- Open the Photos app.
- Go to the menu bar and click Photos.
- Select Settings from the dropdown.
- Select Use Touch ID or Password under the General tab.
Conclusion
Mastering the Photos app on your Mac can significantly enhance your photo management and editing experience. By utilizing the tips and tricks discussed, you can streamline your workflow, organize your photo library efficiently, and unleash the full potential of the app’s editing capabilities. So, dive confidently into your photo collection, armed with the knowledge to make the most of this powerful tool.
In essence, mastering the Photos App on Mac is a symphony of design and development. It’s about orchestrating the elements – from the aesthetic presentation of your albums to the robust functionality of your digital archive. As a Designveloper, I encourage you to approach this journey not just as a user but as a curator of your digital legacy. May your Photos App experience be a masterpiece that reflects the artistry of your life’s moments. Happy designing and developing!
Also published on

Share post on


Table of Contents: